Spirulina Soap Making
Spirulina is a wonderful natural soap colorant that will give your product a light to dark bluish green hue. Spirulina soap making is a ton of fun and will produce absolutely gorgeous naturally colored bars of soap. Beautiful!
What exactly is spirulina? Spirulina is a single celled blue-green algae that is found in highly alkaline fresh water ponds and lakes. It is often used as a dietary supplement, but spirulina soap making is becoming more and more popular to acquire that highly sought after natural blue-green color without any chemical dyes.
In this tutorial, I will demonstrate many of the spirulina soap making methods that you can use to produce a beautiful hue in your bars. Of course, plenty of pictures will be provided in this lesson so that you can actually see the wide array of colors achievable with spirulina. Trust me; by the end of this tutorial, you will know exactly how to color your soap with spirulina powder!
click here to buy spirulina powder
...and also check out our huge selection of other natural soap colorants!
The following spirulina soap making tutorial is a part of our ever growing natural soap colorant tutorial database. We have been working on completing full picture tutorials for as many of the natural soap colorants as we can!
If you think this tutorial, or any of our other tutorials on soap-making-resource.com will help your fellow soap makers, feel free to share them. That's what they are there for!
Below is a list of the natural soap colorant tutorials that have been completed so far. Be sure to check them out!
Colorant Tutorial Database |
Annatto Seeds |
Madder Root |
Comfrey Leaf |
Spirulina Powder |
Also, make sure that you sign up for our free soap making newsletter. In it you will find even more fun soap making tutorials and be notified when new natural soap colorant tutorials are added to our database.
|
Sign Up Today!
*Your information is SAFE with us! |
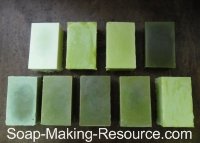
The following is a picture of all the soap batches we made for our spirulina soap making tutorial. You can see the vast range of hues that you can achieve when using spirulina as a natural soap colorant! For all the batches in this tutorial we are using the Soap Making Resource 2 pound acrylic no-line soap mold. Keep reading below for an explanation on how to make each of these batches!
Below is the table of contents for this colorant tutorial. I recommend reading this tutorial straight through so that you can grasp each spirulina soap making method, but if you want to skip to a certain area, simply click on the links below to be taken to your chosen section.
Keep in mind that in this spirulina soap making tutorial, all of the suggested amounts can simply serve as a starting point for your own creativity. If you want a darker hue, add more spirulina powder if you want a lighter hue, add less. Simple!
Infusing Spirulina into your Oils
Spirulina is a wonderful natural soap colorant to infuse into one of your liquid oils. Using a spirulina infused oil will prevent any scratchy feeling from occurring in your soap that can sometimes be present when adding a powdered botanical directly to your batch.
If you don't want to infuse, keep reading below as we have plenty of information on adding the spirulina directly to your batch at trace! Although I always recommend infusing spirulina, you can still achieve lovely results from adding powdered spirulina directly to your batch.
When infusing a natural colorant, you are basically extracting the color from the botanical into one of your liquid soap making oils that is called for in your recipe. I like to accomplish this by combining the colorant and a liquid oil into my crock-pot and applying a low heat to help the color extract from the botanical.
Alternately, if you don't have a crock-pot, you can always create your infused oil by adding the botanical and your liquid oil to a regular pot and applying heat via your cook-top burner. Just use the lowest heat setting possible and be sure to carefully monitor this infusion to make sure it doesn't get too hot.
As the botanical and oil simmers, the oil will gradually turn the color produced from your botanical. This now colored oil is then used in your recipe as usual, producing a magnificent hue! Keep in mind that before using your infused oil, the left over botanical particles should be removed from the oil using a fine strainer or cheese cloth so that none of the scratchy plant matter will be added to your soap.
I usually allow my infusions to take place for about 2 hours in my crock-pot on a low heat setting. The longer you allow your botanical to infuse, the darker the infusion will be. Keeping your infusion times consistent will obviously give you more consistent coloring results.
For each of our spirulina soap making experiments within this tutorial, I will be using the following cold process soap recipe:
- Olive Oil = 10.5 Ounces (50% of total oils)
- Coconut Oil (76 Degree) = 5.25 Ounces (25% of total oils)
- Palm Oil RBD = 4.2 Ounces (20% of total oils)
- Castor Oil = 1.05 Ounces (5% of total oils)
- Lye = 84 Grams
- Water = 8 Ounces
* This recipe has a 5% super fat.
* Ingredients are available to purchase at the soap-making-resource.com online store.
This recipe will make a 2 pound batch of soap and we will be using the Soap Making Resource 2 pound no-line acrylic soap mold for each of the tutorials. Although this recipe is made up of only 21 ounces of oils, once the lye and water are added, it will produce exactly 2 pounds of soap.
Our very first step is to create the infused oil that we will be using at different rates in each of our spirulina soap making experiments.
We will be infusing at the rate of 2 tablespoons spirulina powder per 1 cup (8 ounces) of oil. So, if you want to create 2 cups of spirulina infused oil, simply add 4 tablespoons of spirulina powder to your measured out oil. If you want to create 10 cups of spirulina infused oil, add 20 tablespoons of spirulina powder. Very easy!
Obviously, the higher the ratio of spirulina powder to oil you allow, the darker the infusion will be! Again, this is something I like to keep consistent as if our infusion ratio is consistent, our coloring results will remain more consistent. I find that 2 tablespoons spirulina powder per cup of oil is a good spirulina to oil ratio.
I always like to use Soap Making Resource's grade A olive oil for infusing. Most soap recipes are made up of a pretty high portion of olive oil so it is a very good oil to use for creating infusions!
I strongly recommend that you create more infused oil than what is needed for your batch. This is important so that you don't find yourself short once you start the soap making process. Remember, you can always store the excess oil for your next spirulina soap making project!
Keep in mind that it takes about 2 hours to create your infusion, so if you are short for your batch and you are in the middle of the soap making process, sometimes it is impossible to keep your project on hold for a long enough time in order to make more infused oil.
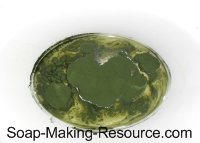
You can see in the below picture that I have my ratio of 2 tablespoons spirulina powder to 1 cup of olive oil added to my crock-pot. Be sure to keep your crock pot on its lowest setting in order to avoid scorching the oil!
We will allow this infusion to take place for exactly 2 hours. If ever you want to create a darker infused oil, simply allow your spirulina and oil to infuse for a longer period of time.
Although I personally prefer applying heat to speed up the infusion process, you can also create your infused oil using the cold infusion method.
To create spirulina infused oil without the addition of heat, simply add your desired amount of spirulina to your olive oil portion and let it set in a mason jar. Over time, the color from the spirulina will extract into your oil, but it may take up to a month to get a dark enough infusion to successfully use in your spirulina soap making batch. Be sure to give your infusion a shake every couple of weeks if you are using this method!
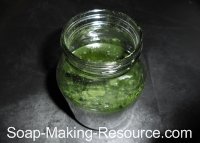
I personally prefer the heat infusion method as results are much more quick and consistent!
Here is what the spirulina infused oil looks like after just two hours of infusing in our crock-pot at a low heat:
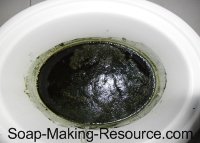
Now thoroughly strain your newly created spirulina infused oil to remove all botanical particles left in the oil. I like to do this using cheese cloth or a paint strainer bag.
Below is a picture showing the drastic difference in color of our spirulina infused olive oil compared with non-infused olive oil:
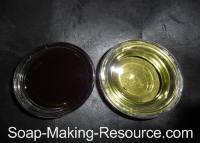
At this point, our spirulina infused oil is successfully created and we are finally ready to do some testing!
For our first test, we are going to allow only 5% of the oils in our recipe to be made up of the spirulina infused oil. This should produce a very light green hue.
The recipe as previously described is a 2 pound batch and is made up of 21 ounces of oils total. 5% of 21 ounces is 1.05 ounces. So, for this first test, we will be using 1.05 ounces of spirulina infused oil in our batch.
Our recipe already calls for 10.5 ounces of olive oil, so we will need to add 1.05 ounces of spirulina infused olive oil and 9.45 ounces of non-infused olive oil in order to include the total amount of olive oil needed for the recipe.
The following is a picture of me adding the 5% (1.05 ounces) spirulina infused oil to my soap. I personally prefer to add the infused oil after all my other oils are initially mixed in with the lye. This allows me to see the soap's transformation of color from a creamy white to brilliant green hue. Very beautiful!
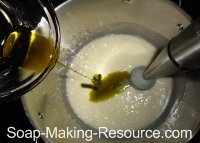
Here is a picture of our soap colored with 5% spirulina infused oil:
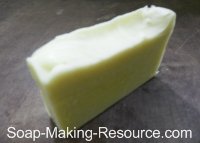
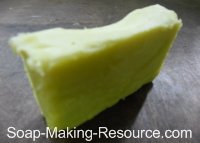
For our next test, we are going to increase the percentage that we allow our spirulina infused oil to take up in our recipe to 15%. Remember, my soap recipe is made up of 21 ounces of oils total. 15% of 21 ounces is 3.15 ounces. So we will allow 3.15 ounces of our total oils to be made up of spirulina infused oil.
Here is a picture of the resulting soap from using 15% spirulina infused oil in our batch:
Finally, we are going to attempt to achieve a really dark color using spirulina. In this batch we will allow 35% of our oils to be spirulina infused oil. 35% of 21 total ounces is 7.35 ounces. So for this recipe, I will add 7.35 ounces of spirulina infused oil. Here is a picture of the resulting soap:
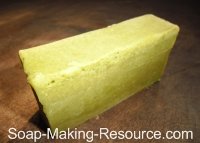
Spirulina apparently does not have a tendency to bleed from the finished product as even when using this high of a percentage of spirulina infused oil no bleeding occurred and no colored suds were present. Pretty impressive!
Adding Spirulina Powder to Soap at Trace
Next, we are going to be taking a look at another spirulina soap making method. Instead of infusing spirulina into one of your liquid oils called for in a soap recipe, we will add the spirulina powder directly to our batch at trace.
Of course, this method will cause more of a scratchy feel in your soap that isn't present when coloring your product using a spirulina infused oil. Some people, however, actually don't mind this scratchy feeling. In fact, some people even prefer the exfoliating properties that botanical powders like spirulina offer to a finished product.
In addition to a scratchy feeling, adding the spirulina to your soap at trace will also give your product a more speckled look instead of a smooth color that can be produced when using infused oils. It will look different, but still beautiful!
In this section, we will be taking a look at the different hues that you can achieve through adding varying amounts of spirulina powder to your soap at a thin trace.
For our first test, we will add just 1 teaspoon of spirulina powder to our 2 pound batch of soap. For this spirulina soap making experiment, we will be using the same exact recipe as described at the beginning of this tutorial.
1 teaspoon per 2 pounds of soap is a rate of ½ teaspoon per pound of soap. So, if you want to duplicate my coloring results, simply add your spirulina powder at the demonstrated rate of ½ teaspoon per pound of soap.
For instance, if you are making a 5 pound soap batch, simply add 2.5 teapoons of spirulina powder as ½ teaspoon times 5 equals 2.5 teaspoons. Simple, right?
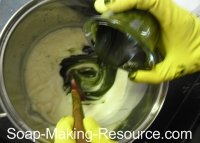
When adding powdered spirulina to your soap batch, I recommend that you pull a few ounces of lightly traced soap from your main soap pot and mix the required amount of spirulina powder into this small soap portion until you reach an even color and smooth texture. You can see in the picture below that I have removed just a few ounces of soap to mix in my spirulina.
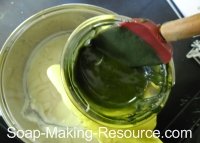
I like to mix the spirulina into this small portion of soap so that I have plenty of time to thoroughly integrate the powder and remove all clumps. If you are forced to mix the entire batch of soap for a long period of time in order to fully integrate the spirulina, you risk the possibility of reaching a thick enough trace that would require you to pour the soap into a mold even before the spirulina is thoroughly mixed into your batch. It's also a lot easier to remove all colorant clumps when dealing with a small portion of soap rather than the entire batch. Trust me on this one!
Once your small portion of soap is an even color and texture, combine it with the rest of your batch.
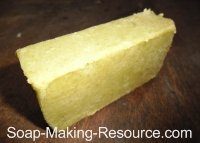
Below is a picture of my finished product colored with spirulina powder at the rate of 1/2 teaspoon per pound of soap.
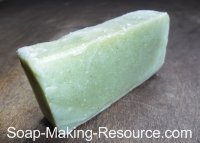
Next, we are going to create another batch of soap, but this time we will add 2 teaspoons of spirulina powder to our 2 pound batch of soap. This is a rate of 1 teaspoon per pound of soap; double the amount used in our prior experiment.
Here is a picture of the resulting soap:
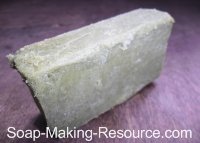
Finally, we are going to add 4 teaspoons of spirulina powder to our 2 pound batch of soap. This is a rate of 2 teaspoons spirulina powder per pound of soap.
Here is a picture of the resulting soap:
Adding Spirulina Powder to your Lye Solution
For our next spirulina soap making experiment, we are going to be adding the spirulina powder to our lye solution, let it steep for a few hours, strain out the spirulina particles using a stainless steel strainer and then add the lye to our batch as we usually would to make soap.
It is best to add the spirulina to the lye solution right away, while the solution is still warm, as the heat will help extract the color from the spirulina.
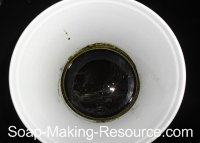
The following is a picture of the spirulina powder soaking in my newly created lye solution:
Next, we are going to pour the lye solution into our melted oils as we normally would to make soap. I like to pour the spirulina infused lye solution into my oils through a fine mesh stainless steel strainer. This will filter out any remaining plant matter that may add an unwanted scratchy feel and speckles to your finished product.
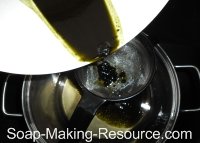
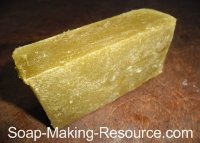
For this test, I added exactly 1 tablespoon of spirulina powder to my lye solution and allowed it to steep for 3.5 hours. Because I am making a two pound batch of soap, 1 tablespoon of added spirulina powder would be a rate of ½ tablespoon spirulina per pound of soap. For consistencies sake, I used the same soap recipe as described at the beginning of this tutorial.
Below is a picture of the resulting soap:
How will your Super-fat Percentage Affect Spirulina Colored Soap?
Next, we are going to take a look at how our soap's super-fat percentage will affect the color produced using spirulina. Not sure what a super-fat percentage is? Click here for an explanation!
It is largely believed that a soap's super-fat percentage will affect the finished products PH levels. Some natural colorants are very sensitive to PH levels and will produce a wide array of colors depending on whether the PH is high or low.
In order to test spirulina and see how it reacts to a soap's super-fat percentage, we are going to make a batch with a super-fat level increased from 5% to 12%. All else will remain exactly the same to ensure that there are no unwanted variables. Ideally, we want to create an environment in which we can solely see the affect that this high 12% super-fat level has on the color produced by spirulina in soap making compared to a 5% super-fat level.
For this spirulina soap making test batch, we will use the exact same recipe as described at the beginning of this tutorial only we will decrease the lye amount from 84 grams to 78 grams which will increase the super-fat percentage in the soap to our needed 12% level.
In the following picture, we will be comparing our 5% super-fat spirulina colored soap bar with our 12% super-fat spirulina colored soap bar. Let me reiterate that each soap is made with the same recipe. Each batch also allowed exactly 15% of its oils to be made up of spirulina infused olive oil of the same 2 tablespoons spirulina powder per cup of oil infusion strength. Everything is exactly the same except for the difference in super-fat level. Let's see what we can discover...
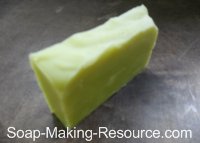 | 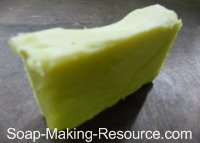 |
As you can see from the picture above, the super-fat level of your soap has very little affect on the hue produced using spirulina as a colorant. Spirulina seems to be a very PH stable natural soap colorant.
How will the Gel Phase Affect the Color Produced by Spirulina
The gel phase is the result of allowing the heat from the saponification reaction to build to very high levels. You can force a soap to "go through gel" by insulating your batch heavily with towels. The gel phase will often have a drastic affect on the color of your finished product.
For this spirulina soap making test, we will force only one of our batches to gel and compare the final hue with a spirulina colored soap that was not allowed to gel.
Both soaps will be made using the same recipe as described at the beginning of this tutorial and will allow precisely 15% of its total oils to be made up of spirulina infused olive oil. Each soap will also have an identical 5% super-fat level. The two soaps will be completely the same except that one of them will go through the gel phase while the other will not.
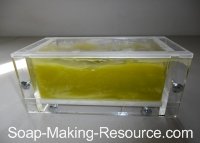
Below you will find a picture of my spirulina soap as it is reaching "gel". Pretty cool!
In the following picture, you will find our gelled spirulina soap on the left and non-gelled spirulina soap on the right:
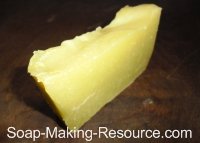 | 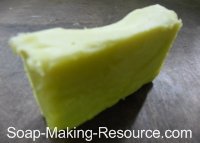 |
As you can see from the pictures above, if you allow your spirulina colored soap to go through the gel phase, it will result in a much darker, more yellow hue.
Closing Statements...
As with all natural green colorants, fading and discoloring can occur if you don't store your soap properly. For best results, it is always a good idea to keep your soap away from direct sunlight. If you store your spirulina soap making product in a cool and dark area, you will have beautifully colored greenish-blue soaps for a very long time!
I truly hope that you all enjoyed this spirulina soap making tutorial. If you think that others will enjoy it too, be sure to share it! Our natural soap colorant database is here to help the soap making community.
Also, thank you for choosing Soap Making Resource as your supplier of quality soap making supplies and ingredients.
If you have any questions at all, feel free to ask us using this contact form. We are happy to help! You can also call our warehouse if you ever want to speak to us by phone.
Return from spirulina soap making to the natural soap colorants main page

